


DNS Manager
Traducciones al EspañolEstamos traduciendo nuestros guías y tutoriales al Español. Es posible que usted esté viendo una traducción generada automáticamente. Estamos trabajando con traductores profesionales para verificar las traducciones de nuestro sitio web. Este proyecto es un trabajo en curso.
The Domains section of the Cloud Manager is a comprehensive DNS management interface that allows you to add DNS records for all of your domain names. This guide covers the use of the Domains section and basic domain setup. For an introduction to DNS in general, see our Introduction to DNS Records guide.
NoteLinode’s DNS service is anycasted to over 250 locations around the world. This provides distributed denial-of-service (DDoS) attack mitigation, load balancing, and increased geographic distribution for our name servers. These factors make our service reliable, fast, and a great choice for your DNS needs.
NoteTo use the Linode DNS Manager to serve your domains, you must have an active Linode on your account. If you remove all active Linodes, your domains will no longer be served.
Getting Started
The Domain Name System (DNS) attaches human-readable domain names to machine-usable IP addresses. In many ways, it is the phone book of the Internet. Just like a phone book can help you find the phone number of a business, DNS can take a domain name like google.com and translate it into an IP address like 74.125.19.147. This global system allows users to remember the names of websites instead of their numeric IP addresses.
NoteAll steps in this guide are completed within the Domains section of the Linode Cloud Manager.
DNS Set-Up Checklist
DNS records are only actively hosted on accounts with at least one Linode. When setting up a domain name on your Linode, make sure you perform the following steps:
- Register (purchase) a domain name if you haven’t already.
- Set your domain name to use Linode’s name servers. You’ll need to do this on your domain registrar’s website and then wait up to 24 hours for the change to take effect.
- Use the DNS Manager to add a domain, and then start adding some basic DNS records.
- Set reverse DNS.
- If you have any special DNS requirements, such as when using a third-party email server, add additional DNS records for your specific needs.
Use Linode’s Name Servers with Your Domain
After you purchase a domain, log in to your domain registrar’s control panel and set the name servers for your domain name to the entries below. See the instructions on your domain name registrar’s website for more information.
ns1.linode.comns2.linode.comns3.linode.comns4.linode.comns5.linode.com
NoteDNS changes can take up to 24 hours to propagate throughout the internet, although the changes are usually visible within several hours.
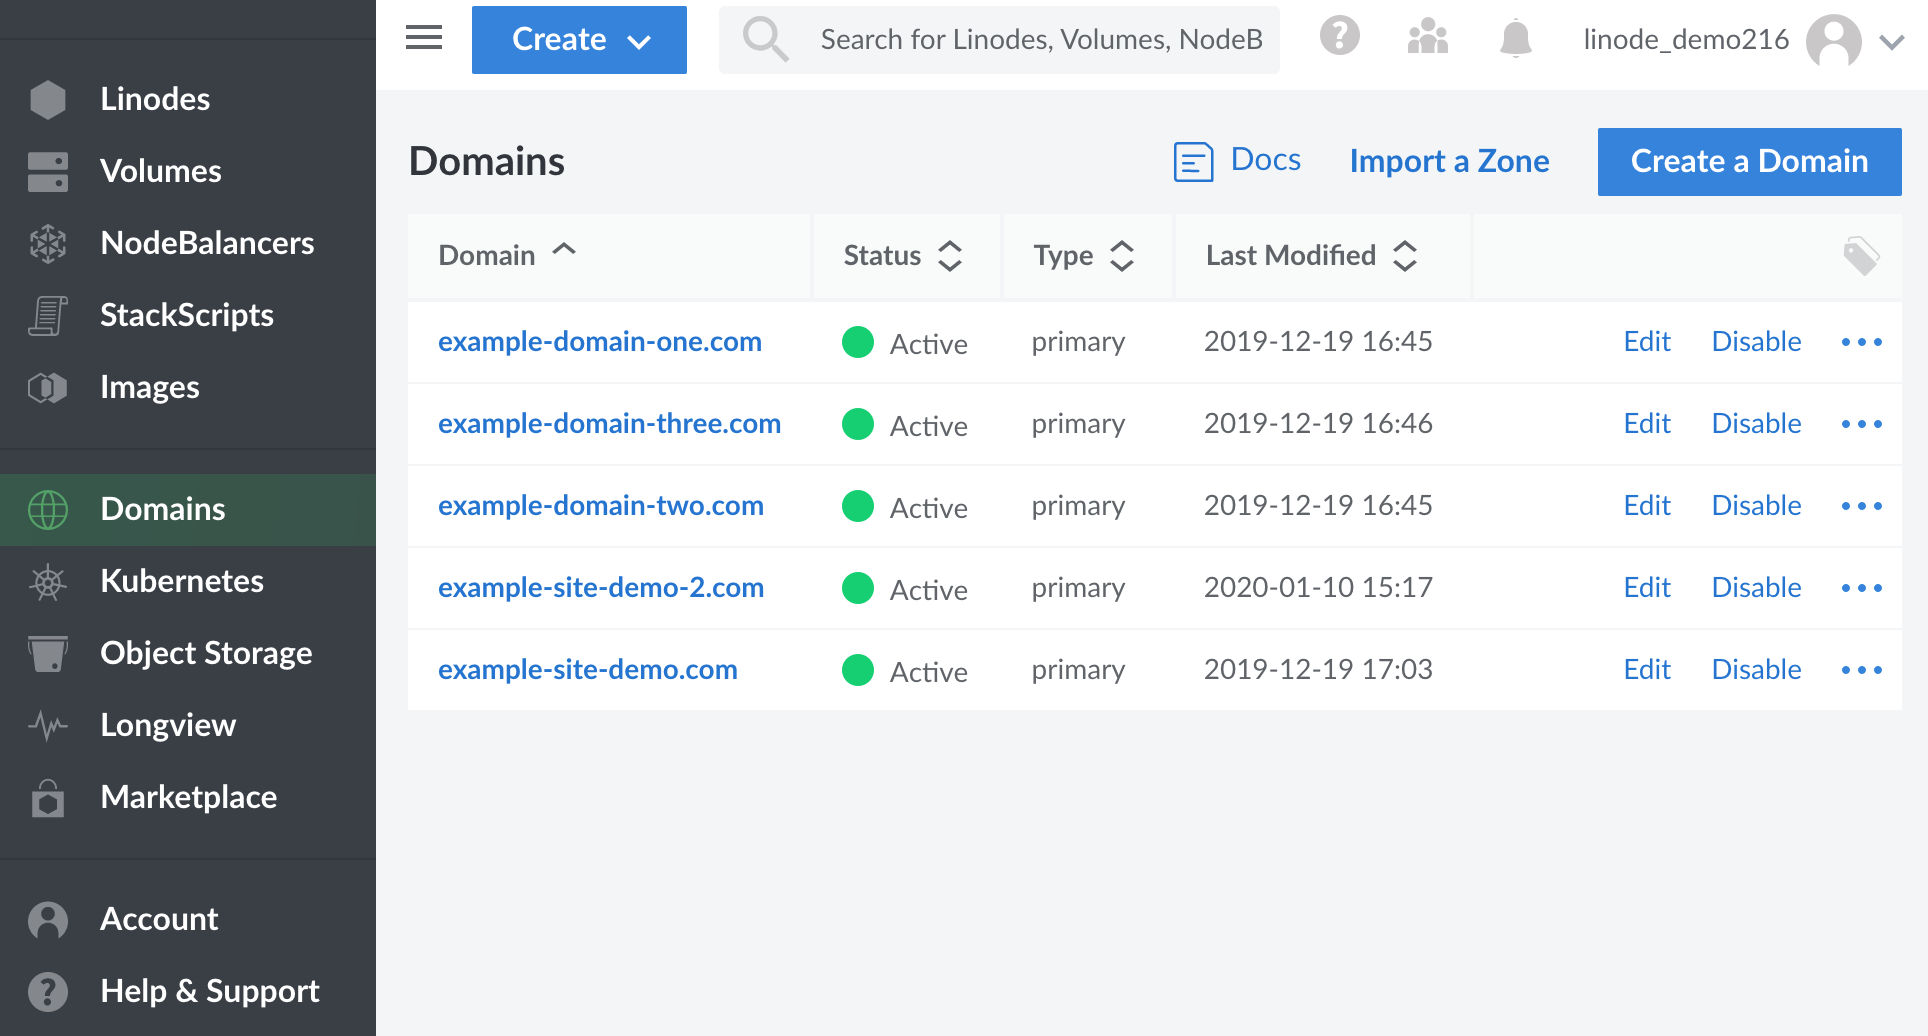
Create and Manage Domains
The Linode DNS Manager allows you to create and manage domains. The DNS manager can be accessed from the Domains section of the Linode Cloud Manager. To find this area, log in to your Cloud Manager account and click the Domains link in the sidebar.


DNS Manager Options Overview
The section below provides a detailed description of the available options within the Domains section of the Linode Cloud Manager:


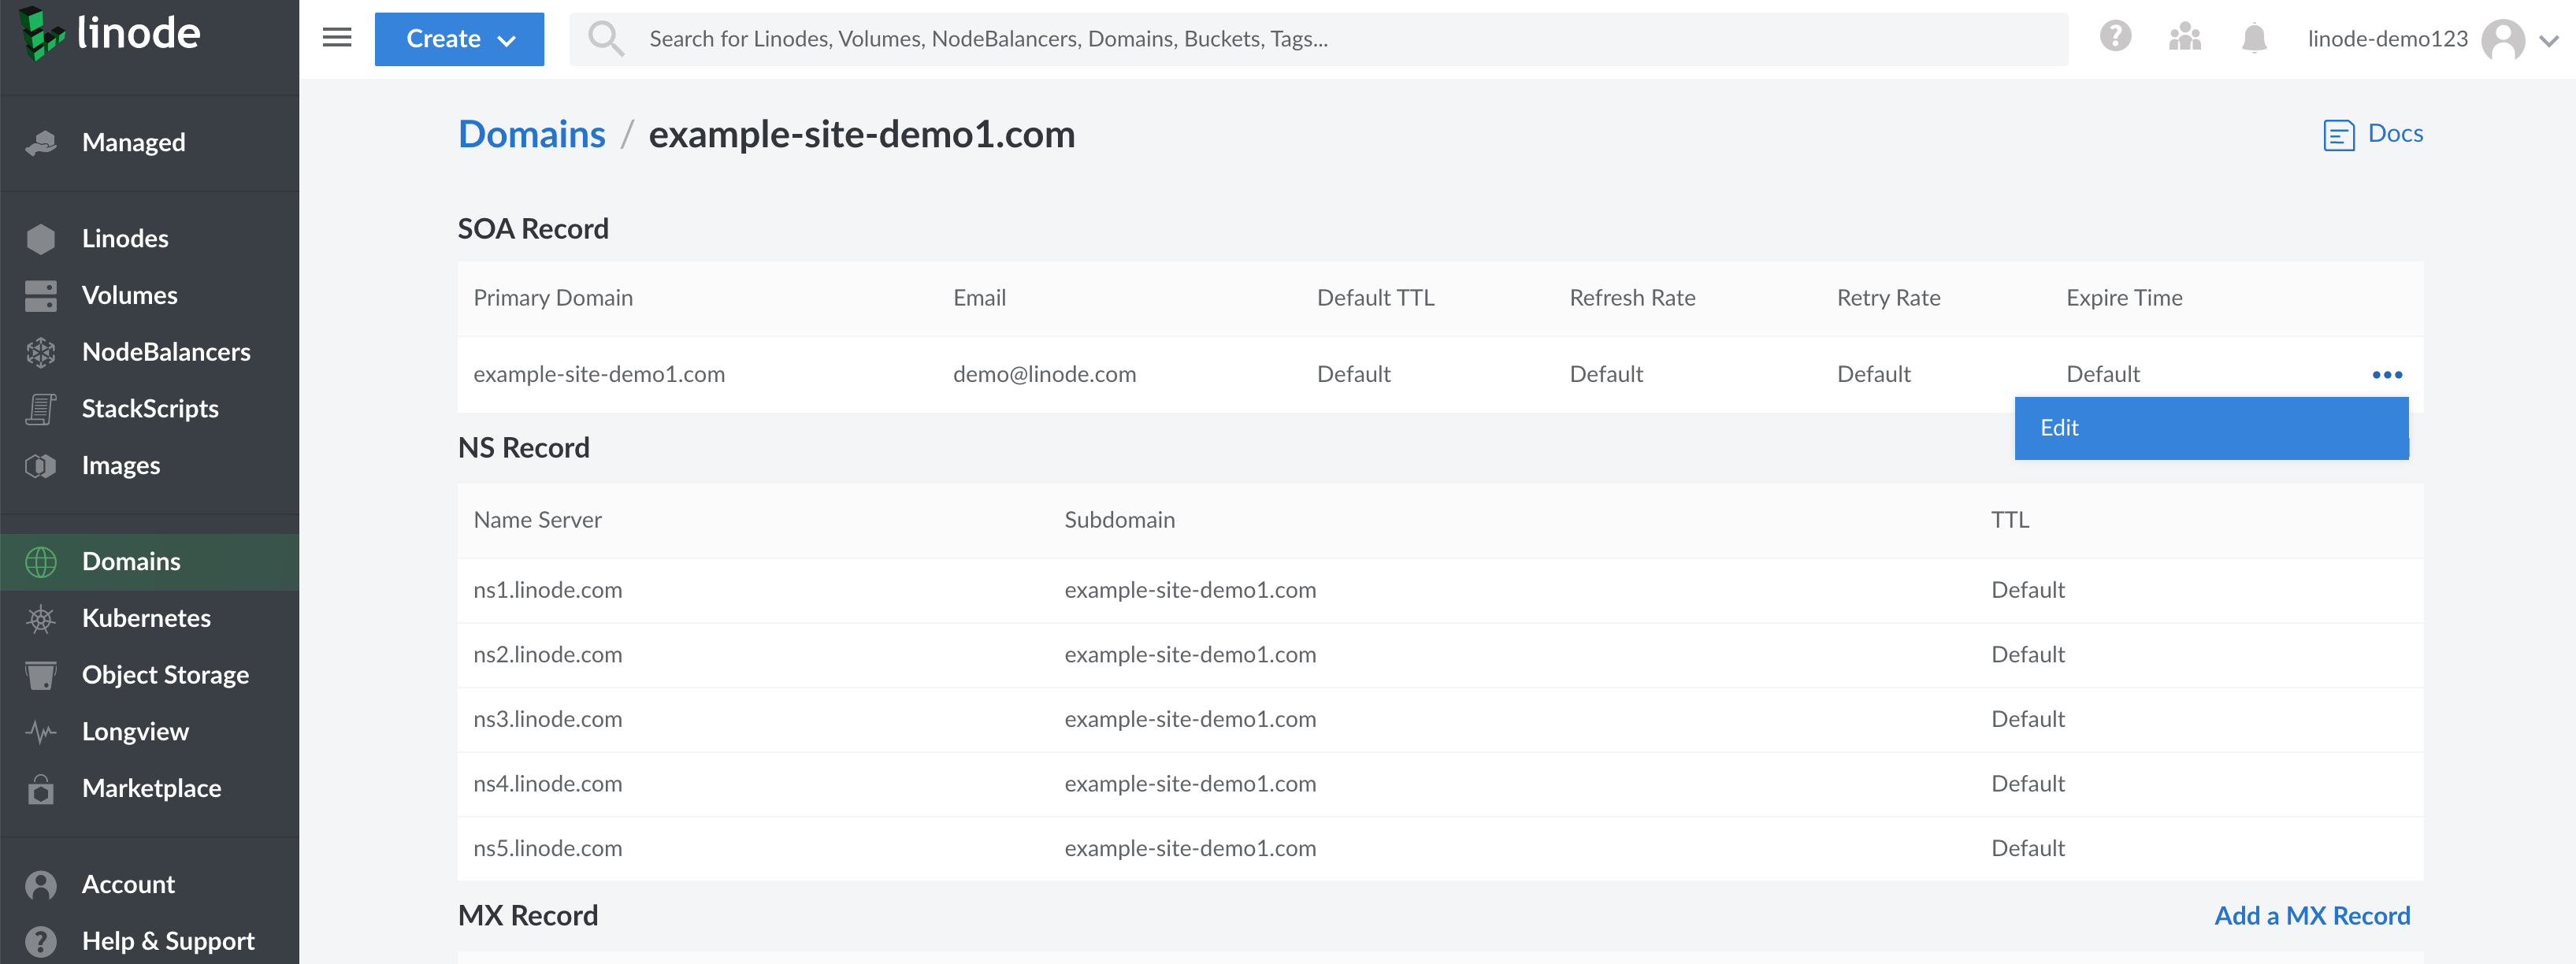
All of your domains are listed under the Domains heading. To access your Domain’s DNS records, click the name of a Domain.
Click the name of a domain to add or edit its DNS records. When you add a domain, the Cloud Manager will automatically create a zone file for your Domain. Before you can add any DNS records, you must add a domain.
Note
A domain zone is a collection of DNS records for a single domain name. Creating a domain also creates its corresponding domain zone. Linode’s APIv4, which is the backbone of the Cloud Manager, will validate the created zone file for any errors.
The term domain zone becomes synonymous with the term domain, both in terms of use and administration.
If you have a zone that can be exported from a server or another hosting provider, click Import a Zone to import it.
Click Create a Domain to create a new domain zone.
Click on the Edit button next to a domain zone to edit DNS records within a zone.
Click on the more options ellipsis to corresponding to clone an existing zone, or remove a zone.
Add a Domain
If you’re new to Linode, or if you’ve just purchased a new domain name, the first step is to add a new domain in the Domains section of the Cloud Manager. If you don’t know what DNS records to add, the DNS Manager can insert some basic records when you create the new domain.
NoteCreating a domain also creates its corresponding domain zone.
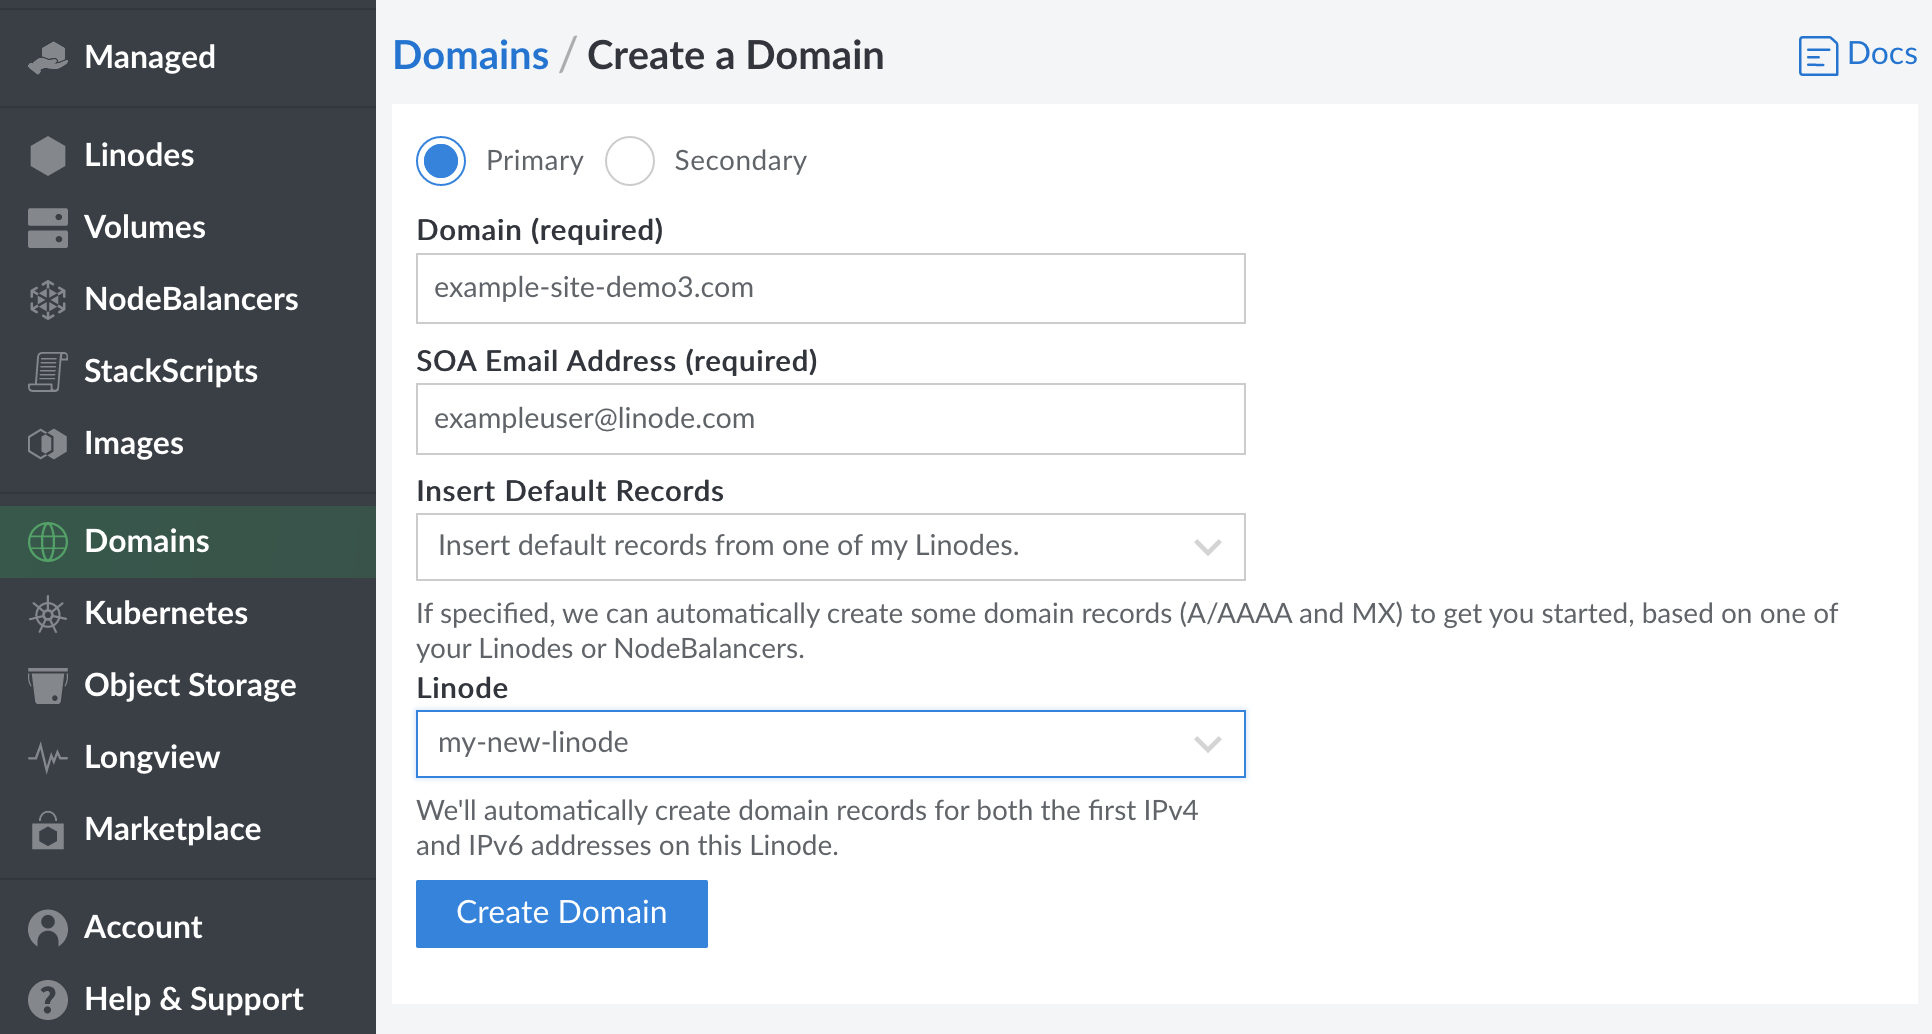
From the Domains section, click on Add a Domain. The Create a Domain panel will appear where you can fill out the form fields with your domain’s information.


If you want to add a Secondary zone instead of a primary zone, click the Secondary radio button. If not, you may skip to the next step.
In order for Linode’s DNS servers to function as secondary zones, your DNS primary server must notify and allow AXFR requests from the following IP addresses:
104.237.137.10
65.19.178.10
74.207.225.10
207.192.70.10
109.74.194.10
2600:3c00::a
2600:3c01::a
2600:3c02::a
2600:3c03::a
2a01:7e00::a
NoteOn December 15th, 2020 the IP address74.207.225.10was added to replace the deprecated IP address75.127.96.10. The IP address75.127.96.10is no longer used for AXFR requests.
Enter your domain name in the Domain field. An example is shown above.
Enter an administrator’s email address in the SOA Email Address field.
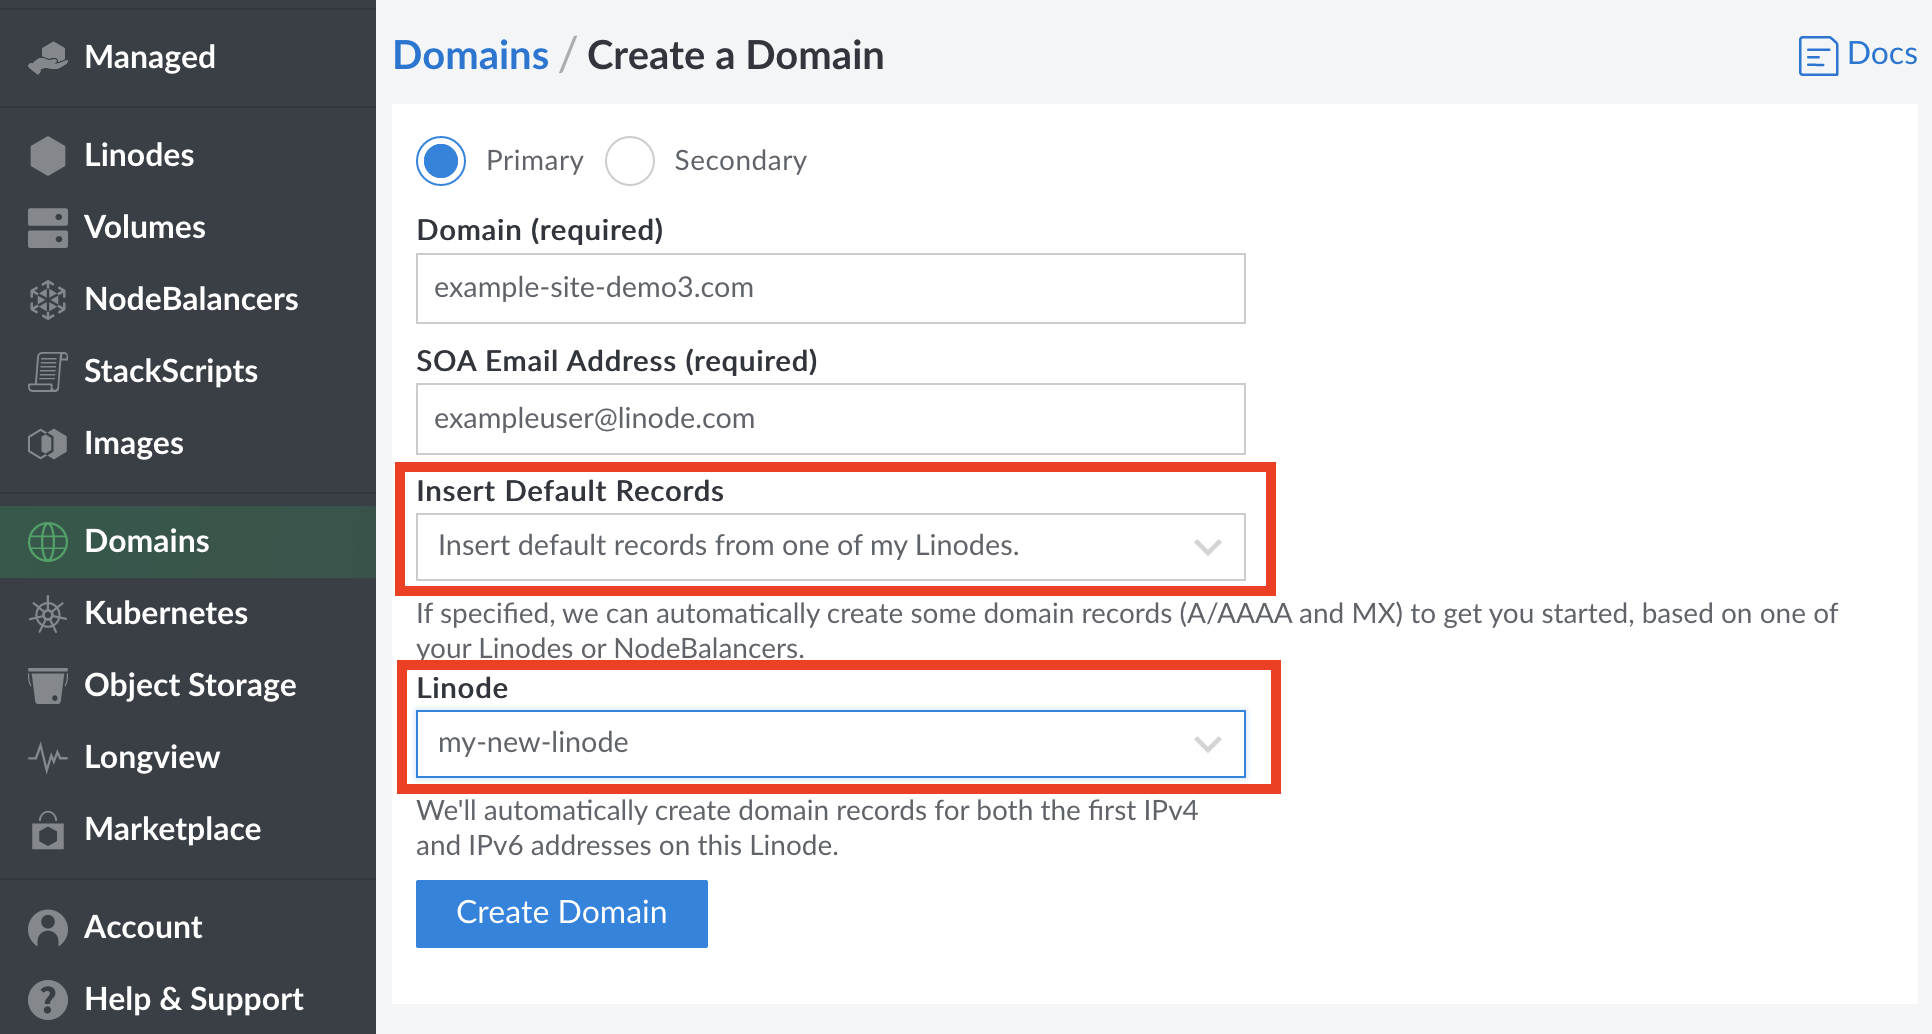
If you are unfamiliar with DNS, the DNS Manager can automatically create some basic DNS records to get you started. To have it insert these records, select Insert default records from one of my Linodes, or Insert default records from one of my NodeBalancers using the Insert Default Records drop-down menu. Then, select a NodeBalancer or Linode from the drop-down menu that appears for the DNS records to be associated with.


Alternatively, to keep the domain zone empty and prevent the DNS Manager from creating DNS records, select Do not insert default records for me.
Click Create Domain. If you selected the option to have the DNS Manager insert basic DNS records, those records will be visible on the Domains detail page. The created records should include SOA, NS, MX, and A/AAA.
If you elected to keep the zone empty, you can start adding DNS records now. The Domain detail page will contain an SOA and NS record for the domain. Skip to the Adding DNS Records section for instructions.
Add DNS Records
After a domain has been created, you’re able to add DNS records. Each type of DNS record is used for a different purpose. The applications that utilize your domain determine which DNS records you need to add.
Select a domain from within the Domains section of the Cloud Manager.
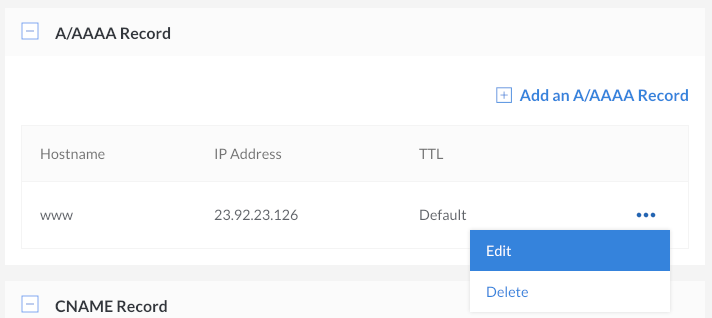
The page for a domain is divided into sections for each type of DNS record. Locate the section for the type of DNS record you want to add, then click Add a Record to display the Create Record form.
Complete the Create Record form with the settings needed for your desired functionality. The exact form fields vary depending on the type of DNS record you select.
Note
For advice on creating various types of DNS records, see the following sections of the DNS Records: An Introduction guide: A and AAAA, CNAME, MX, NS, SPF, TXT, and others.As an example, a new A/AAAA record requires the following fields:
- Hostname: The hostname you wish to use. This is also referred to as the subdomain. Leave this field blank (or enter a
@character) to use the base domain (example.com) or enter a value to use a specific subdomain. For instance, enteringwwwcreates a record forwww.example.com. - IP Address: Enter the IPv4 address of the target server if you wish to create an A record. Enter the IPv6 address of the server to create a AAAA (pronounced quad A) record. See the Find Your Linode’s IP Address guide for help locating an IP address on your Linode Compute Instance.
- TTL - Time To Live (pronounced as
lɪv): Sets the lifespan of the cache for the DNS record. Setting the TTL to 5 minutes is recommended for many use cases. If Default is selected, the TTL is set to 24 hours. To provide some context, most DNS queries are handled by a DNS resolver, which acts as the middle entity between the end user’s computer and the authoritative name servers. When the DNS resolver receives a query for a new DNS record, it asks the authoritative name server and stores the result in its cache. If another request for that DNS record comes in and the TTL value has not yet elapsed, the DNS resolver uses the cached copy. If the TTL has elapsed, the DNS resolver re-queries the authoritative name server.
- Hostname: The hostname you wish to use. This is also referred to as the subdomain. Leave this field blank (or enter a
Click Save. Your DNS record is created and visible in the Cloud Manager.
NoteNew DNS records may take up to 24 hours to propagate throughout the internet, although they are usually visible within several hours.
Edit DNS Records
To modify a Domain’s existing DNS records:
From the Domains section of the Cloud Manager, select the domain whose DNS records you’d like to edit. The DNS records for the selected domain zone will appear.
Next to the DNS record you would like to edit, click on the more options ellipsis.
Select Edit from the menu.


Edit the DNS record by modifying the existing values in the fields that appear.
Click Save.
Subdomains
Add a subdomain by adding an entry under the A/AAAA Record heading, with just the subdomain. For example, for subdomain.example.com
Add
subdomainunder Host.Set the IP address.
Adjust the TTL if necessary.
Click Save.
Wildcards
A wildcard DNS record will match requests for domains that do not exist. Wildcards are often used to point all non-existing subdomains to an existing top level domain. For example, if a queried first-level subdomain does not exist, the IP address specified in the wildcard DNS record will respond.
To create a wildcard DNS record:
Navigate to the Domains section of the Cloud Manager and click on the Domain that you’d like to add a wildcard DNS record to.
Find the A/AAAA Record section and select Add an A/AAAA Record.
When the Create A/AAAA Record panel appears, enter an asterisk (
*) in the Hostname field and provide a valid IP address in the IP Address field.Click Save.
NoteA wildcard must always be the furthest subdomain from the TLD (top level domain), i.e.*.example.com. If you would like to add a wildcard as a subdomain for a subdomain, you will need to add a new domain zone for that subdomain and then add the wildcard record to it. For example, to create*.subdomain.example.com, you must add a separate domain zone forsubdomain.example.comfirst, then add an A/AAAA DNS record to that zone as indicated above.
Sub-Subdomains
The Linode Cloud Manager does not support the addition of a subdomain on top of an existing subdomain in the same domain zone. For example, if you have example.com as a domain with an A record for subdomain.example.com, you cannot create another.subdomain.example.com within that same domain zone.
Instead,
add the subdomain to the Cloud Manager as a separate domain with its own domain zone and DNS records. Then add an A/AAAA record for the second-level subdomain. In the previous example, you would create a domain zone named subdomain.example.com, the create an A/AAAA record with hostname another inside of it.
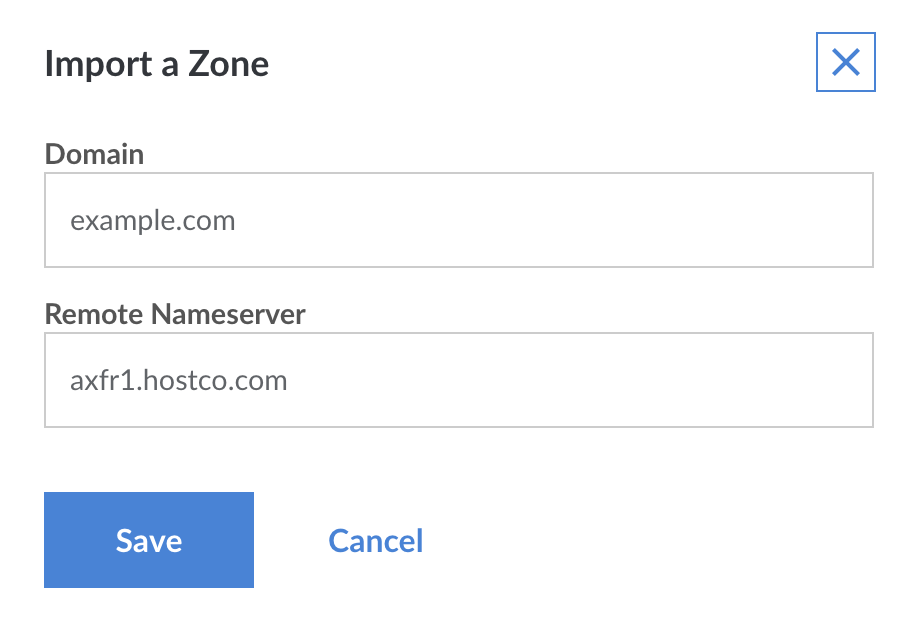
Import Domains with AXFR
If you’re migrating domains to Linode from another hosting provider and that provider allows zone transfers from its DNS server, it may be possible to import your existing domain and its DNS records into the Linode Cloud Manager. If the import is successful, the domain along with all of its existing DNS records will be available in the Domains section of the Cloud Manager.
Here’s how to import a zone file:
From the Domains section, click on Import a Zone.


Enter the domain name in the Domain field, as shown in the example above.
Enter the name server in the Remote Nameserver field.
Note
The name server must allow zone transfers (AXFR) from the following IP addresses:
96.126.114.97 96.126.114.98 2600:3c00::5e 2600:3c00::5fClick Save. The Linode Cloud Manager will connect to the remote name server and import your existing DNS records.
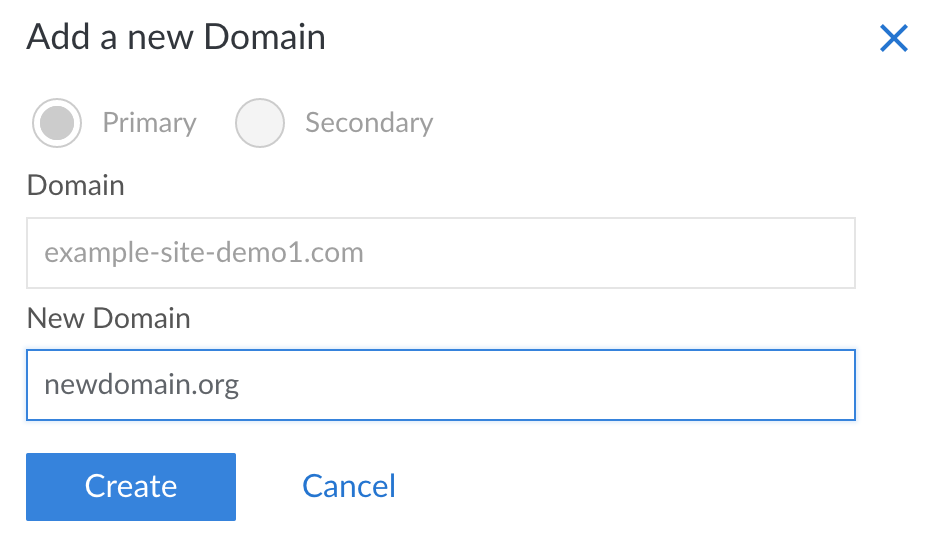
Clone DNS records
The Clone feature allows you to copy DNS records from an existing domain in your Linode account to a new domain. If you’ve already set up DNS records for one of the services you host on your Linode account, this is a good way to quickly assign another domain to that same service.
Here’s how to clone DNS records for an existing domain:
Click on the more options ellipsis corresponding to the domain whose DNS records you would like to clone and select Clone from the menu.
Enter the name of the new domain in the New Domain field.


Click Create. The DNS records will then be copied from the existing domain to the domain.
Delete Domains
If one of your domain names has expired or if you want to start hosting it on another DNS provider, you should permanently delete the domain and all of its associated DNS records.
From the Domains section of the Cloud Manager, find the domain you would like to delete and click its more options ellipsis.
Select Delete to permanently delete the domain, including all associated DNS records. It will only take a few minutes for the changes to take effect.


Caution
Once deleted, you MUST delete the Linode nameserver entries from the domain at the registrar level. This is a very important step; if the entries are not deleted, someone could use your domain without your permission.

Transfer a Domain Zone
Linode’s DNS servers allow Domain zone transfers to non-Linode DNS servers that you designate and trust. This feature can be used to transfer a Domain zone to another hosting provider’s DNS servers. To enable this capability, you will need to alter your Domain’s SOA record. This section will cover these steps.
CautionGranting another server access to zone information is potentially dangerous. Do not add any IP addresses that you do not know or trust.
From the Domains section of the Cloud Manager, find the domain for which you would like to enable Domain zone transfer and click on the entry to access its Domain records.
Viewing your Domain’s records, under the SOA Record section, click on the more options ellipsis corresponding to your Domain’s SOA records and select Edit.


In the Edit SOA Record pane, find the Domain Transfer IPs section and enter the IP addresses corresponding to the DNS servers you’d like to give access to your Domain’s zone file. Each field should contain a single IP address and additional fields will appear when the Add an IP link is clicked.
When you’ve completed your update, click on Save.
Note
When the DNS servers no longer need access to your Domain’s zone file, remove the IP address from the Domain Transfers field.
When performing the AXFR DNS query, point your secondary name server to axfr1.linode.com (or up to axfr5.linode.com) instead of ns1.linode.com. To test the AXFR query locally, follow the above instructions to allow your computer’s IP address as one of the Domain Transfer IPs in the SOA Record for your domain. This may take a few minutes before going into effect. Then run the following dig command, replacing example.com with your domain:
dig axfr example.com @axfr1.linode.com
The query should output all DNS records on the domain. If a Transfer failed message is received instead, it may be because your computer’s IP address wasn’t added properly within the DNS Manager. Review the settings, wait a few minutes, and then try again.
DNSSEC Limitations
The Linode DNS Manager does not support DNSSEC at this time. If you have DNSSEC enabled at your domains registrar it will cause name resolution failures such as NXDOMAIN when an attempt is made to access the DNS.
Next Steps
Now that you are familiar with Linode’s DNS Manager, you should set up your reverse DNS configuration, and consider reading through at our Common DNS Configurations guide. For help with DNS records, see our Troubleshooting DNS guide.
This page was originally published on